Sometimes we need to add someone’s signature to the document. When we don’t have a digital pen, we can edit the signature image and then insert it into the document.
Removing the background in Krita can be done by separating the foreground image and background image. Krita has a plugin called G’MIC-Qt which has tons of features for quick image editing, including Extract Foreground. This tutorial can be used on any image you want to extract foreground from.
Open Krita
Create a new document
Insert the image that need to be edited by go to Layer -> Import/Export -> Import Layer… then choose the file
Go to Filter -> Start G’MIC-Qt
Search ‘Extract Foreground’, click
Click Apply
Use left click to add a green dot, right click to add a red dot. You can zoom the image, and drag or delete dots. The green dot is the foreground control point, the red dot is the background control point. The more points you place, the better the results.
After you place the points, close the window, press OK and wait for the result.
This setting can be applied for both portrait and landscape mode and Godot will automatically resize the display for different screen sizes and ratios.
Resolution: Using Godot’s default resolution. This resolution is the size of the area that you work with in the editor. Godot will not attempt to switch the monitor to this resolution. We can control how the viewport will be resized and stretched to different mobile screen sizes later. 600×1024 for portrait and 1024×600 for landscape. or 1024×1024 to support both.
Orientation: Set the orientation for your game. Portrait, Landscape or Sensor to use both.
Stretch Aspect: set the Stretch’s aspect and mode to 2D Expand to keep the image’s aspect ratio when stretching the screen, but keep neither the base width nor height.
Input Map: set the input map for touch for All devices, Left button of Mouse.
Background: for background of a game, if it’s no required to place it on a specific location, then you can place a Center Container with a TextureRect in it, to keep the background on center. so that the background can still fill the screen at various screen dimensions, use an image with a size slightly larger than the resolution size. for my game I use size 810×1710. you can use full HD size or the equivalent of 1080×1920, 1920×1080, or 1920×1920 to support both orientation.
Game UI: always use Control Nodes for the game UI to keep the UI position and size looking good on various screen dimensions. Containers and Anchors of control nodes are very useful for managing this.
Autoload: use Autoload to run scripts or scenes needed in all scenes such as game controller, audio, local notification, scene loader and others.
Background Loading: use Background Loading to load heavy scenes to ensure all assets run properly when the scene is rendered.
Audio Controller: Use the new global scene to control how audio plays in the game, to make it easier when we need to run multiple sounds and music at once.
Android App Bundle: Make sure all android setup is done, check required keystores and jdk and try to create .aab file before diving further in development.
App-ads.txt lets advertisers know which ad sources are authorized to sell ad inventory. Add your app-ads.txt and Google Admob will verify that it’s set up correctly.
This article is for people who don’t need a fancy website and just want to build a simple website with app-ads.txt that works for their app.
Open your Google Drive
Create a new folder specifically for your website
Create a new Google Sites in that folder, design your website
Go to takeout.google.com
Under the Select data to include use the Deselect all option
Scroll down to the Drive section and then check/tick to include
Use the All Drive data included option and then Deselect all and select the new folder you have created for export, then click Next step
Choose file type, frequency and destination as you like, then use the Create export button and Google Takeout will notify you when your export is ready for download
Open the Google Takeout you downloaded, duplicate the .html file (which should be index.html) and rename it to index.html. ex: copy and rename Games.html to index.html if Games.html is the home page.
Go to apps.admob.com
Go to menu Apps->View All Apps->How To Set Up app-ads.txt
Create a new notepad file, name it app-ads.txt
Paste code snippet into that file, save
Move app-ads.txt to the Google Takeout folder that you downloaded
Open Github, create a repository for your website
Push the contents of your Google Takeout folder into your repository
Go to your repository Settings->Pages, you can set your custom domain here
Copy the website address and paste it on the developer’s site in your app’s store listing
Wait for several hours, then check the links to your site and your app-ads.txt to make sure they are correct
Temukan semua kata di setiap level untuk memenuhi koleksi kamus kosakata! Permainan ini memiliki tingkat kesulitan dan tema yang beragam mulai dari tema warna hingga tema mistis! menemukan kata di setiap level nya akan cukup menantang bahkan untuk para bang jago!
Permainan ini dibuat dengan penuh semangat! jika kalian memiliki saran dan kritik untuk pembaruan konten kedepannya, hubungi kami di: blureogames@gmail.com. Saran dan kritik kalian akan sangat membantu kami untuk berkembang lebih baik!
I tried to create a 3d model chibi character, but I don’t feel so good .. and I found out that the face is too detailed and looks creepy… What things do I need to improve?
Exporting for Android has fewer requirements than compiling Godot for it. Make sure to meet the requirements before exporting for Android.
This error happens because when we tried to export an APK file from the project, we cancel it mid progress. Close Godot, Go to C:\Users\Username\AppData\Local\Temp\Godot\ and delete the file named “tmpexport-unaligned.apk.tmp”. After that, we can open the project and start exporting again.
If this problem persists after you open Godot again, repeat the steps and restart the computer before opening Godot.
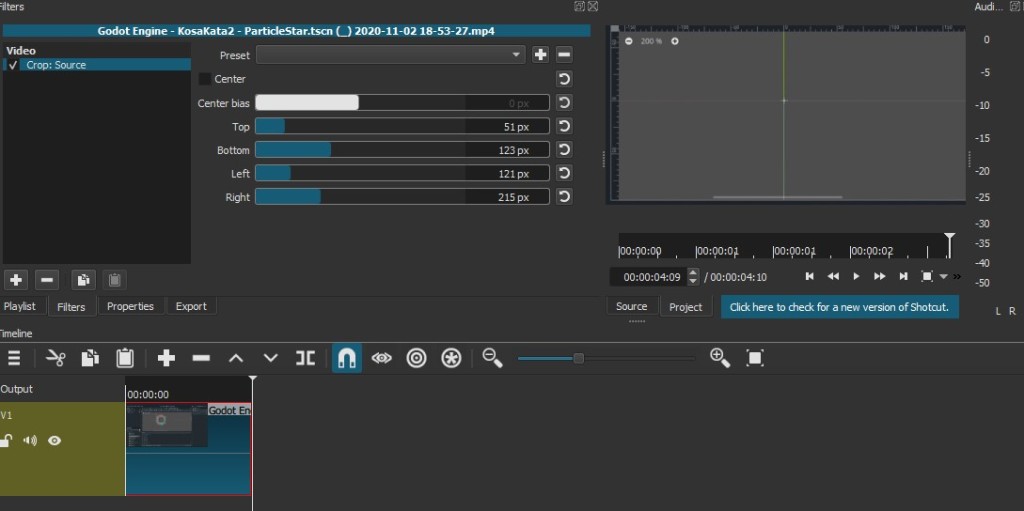
Shotcut is a free, open source, cross-platform video editor. Shotcut was originally conceived in November, 2004 by Charlie Yates, an MLT co-founder and the original lead developer.
Open the file
Click Playlist tab, Click + to add the Source to the playlist
Drag the video from playlist to timeline
Click Filters, Click + to add a filter then search for a filter with the name “Crop: Source”
Drag the top, left, right, and the bottom value
Click Export then click Export Files to save it in .mp4 format